 Image 1 of 4
 Image 2 of 4
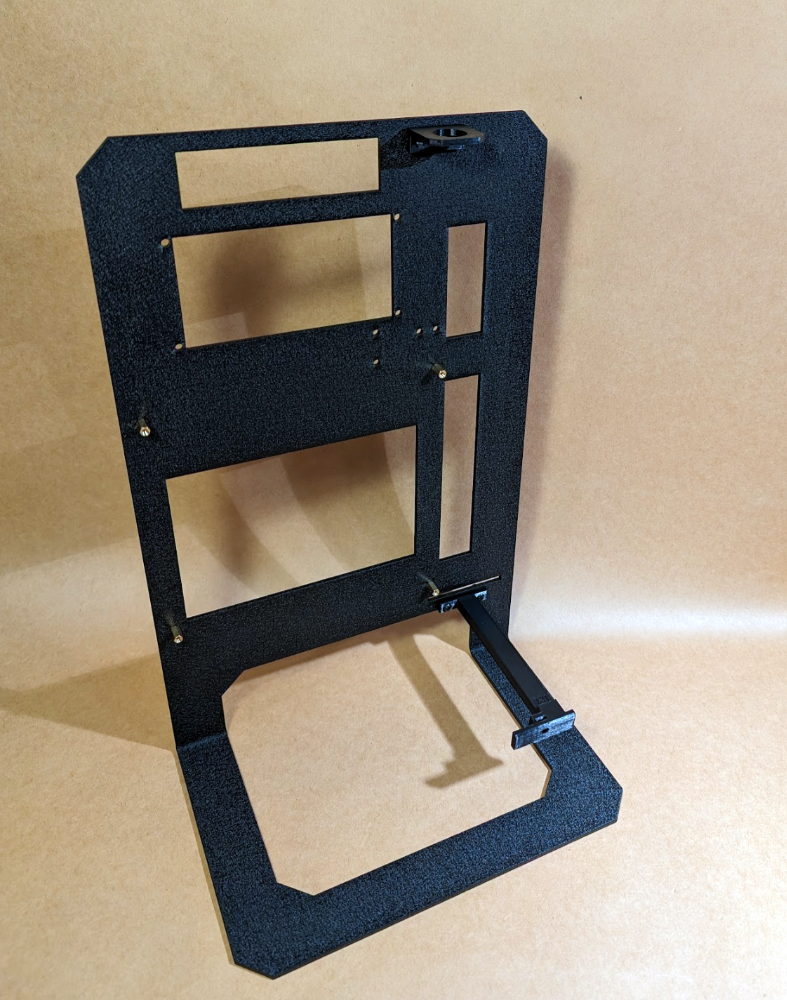 Image 3 of 4
 Image 4 of 4
I’ve always been drawn to simplicity, and that extends to ideas like keeping the computer’s footprint on the desk minimal, stripping away unnecessary parts, and easy access to what’s there. You’ll find all of that in this vertical, riserless, open-air stand. The vertical arrangement minimizes desktop footprint, it also allows for unlimited GPU length, and with the IO oriented downward it doesn’t compromise GPU cooling as can happen with some GPUs when positioned with their IO pointing up. The lack of a riser means it’s one less unnecessary part to worry about, and if you’re here looking at this you’re probably an enthusiast who pays attention to the case world and you know the potential downfalls of poorly made or mounted riser cables. Lastly, the open air design allows all the parts unlimited access to fresh, cool air without having to rely on a pile of case fans. It also allows you to use GPUs of any width and length and CPU coolers of any height. The frame’s handle makes picking it up to move simple and the open bottom makes it about as easy as you’ll ever get with an IO down orientation to plug and unplug cables.
Specs:
Footprint - 155x230mm (This is the footprint of the stand itself.)
Height - 360mm (This is the height of the stand itself, GPUs longer than about 305mm will stick out above the top edge.)
Distance to IO - 55mm (USB cables and dongles, headphone connectors, ethernet cables, and most HDMI cables will fit with no problems. If you have DP cables that use the huge plastic housing with the button you might need to buy a cable with a smaller connector.)
Construction - 3mm cold rolled steel.
Compatibility - Mini-ITX Motherboards and SFX or SFX-L PSUs. GPUs with DVI ports or anything that protrudes from the IO bracket will likely interfere with the GPU mount the stand comes with. Email me about this and I can print a mount that will fit.
Finish Options:
The stand is offered in a matte black powder coat, in an unfinished “raw” state, or a limited run of rusted stands. The matte black powder coating is a wrinkle finish and generally will hide fingerprints. The unfinished stand is bare steel and can be finished or left unfinished by the end user. Unfinished steel can and will rust, and it may come with some light surface rust, so if you don’t want that look it should be finished with something to protect it. Unfinished cases are as they come from manufacturing and can have handling marks, smudges, etc… The rusted finish results in visually unique patterns and is accomplished by repeatedly applying rusting agents and exposing the stand to the elements as the rust forms. After rusting, they’re finished with a layer of Penetrol to seal the finish and give a slightly glossy look. The rust/Penetrol finish is not as robust as the powder coating and while it holds up just fine to normal handling it is susceptible to scratching and chipping if it’s hit with something sharp. The good news is you can just let any scratches or chips rust again and it just makes the finish even more unique.
What’s included:
Stand
Motherboard standoffs
Motherboard screws
PSU screws
3D printed GPU IO bracket
Screws for GPU IO bracket
Power button
3D printed power button bracket
Screws for power button bracket
2mm hex key
Build tips:
There are zip tie holes between the motherboard and PSU, they’re best used to secure the 24 pin cable down snug after it’s connected. Depending on the length of your cable you might not be able to tighten it all the way against the stand, be nice to the cable. Then, fold/twist/tuck your other cables down into that space and zip tie them neatly to the 24 pin cable and everything should look pretty neat even without custom cables.
The zip tie holes beneath the power button can be used to keep the extra length of the power button cable neat if you don’t want to shorten it.
If the stand gets bumped in shipping and isn’t perfectly vertical or if you have especially heavy components and the weight causes the stand to tilt a little forward you can very carefully hold the base and gently push the vertical part to tweak the exact angle. Be very gentle here especially with powder coated stands, you can easily push with a lot more force than the weight of your components.
The standoffs included with the case should fit most motherboards with backplates. If your motherboard has a backplate that doesn’t fit you can remove the backplate or use slightly taller standoffs. If you use taller standoffs you’ll want to shim the GPU IO bracket to make up for the height of the new standoffs, or shoot me an email and I will print you a taller one and send it for a few bucks plus shipping. If you have a 3D printer of your own you could of course just draw up a taller one.
Make sure your motherboard/GPU are sitting nice and square with the stand before you tighten the motherboard screws down, you should be able to get everything aligned nicely with the small amount of play you have between the motherboard’s mounting holes and the screws.
Production Changes:
Production Batch 1: Moved power button to front side.
Production Batch 2: Added mounting holes for future AIO bracket or other accessories.
Production Batch 3: Moved power button bracket threaded inserts to rear side. Fabricator will no longer press threaded inserts as close as needed to PCI-e bracket slot, so mounting holes for GPU bracket are now threaded directly into the metal rather than using threaded inserts.